 Enduro Water-Based Conversion Varnish
 Enduro Water Based Stain Blocker Primer
 Enduro Water-Based Tintable 2K White Poly
 Enduro Water-Based Pro Series White Polyurethane
 Hard Wax Oil & Hardener
 Gel Stains
 Pro Image Flooring Topcoat
 Jen Poly Brushes
 Stir Stix
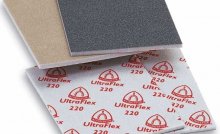 Ultraflex Softback Sanding Sponge
General Finishes offers a complete line of oil based, water based and wax products. Application techniques differ between oil based products and water based products. Oil based gel products require different application techniques than liquid oil based finishes - both produce equally beautiful, lustrous wood tone finishes. Use the information below to assist you in selecting the best finish for your project and finishing style. There are several factors that may influence your choice.
Wipe-on Liquid Stains and Top Coats
Wipe-on liquid oil based products such as GF Wood Stains, GF Arm-R-Seal Top Coat and GF Seal-A-Cell Clear, are made with the highest quality pure urethane resin. Because of their thinner viscosity, liquid urethanes are recommended for large projects. Liquid oil based stains penetrate more deeply into the wood than gel oil based stains or water based products and will bring out more variation in the wood. You will see rich variations of light and dark tones in the grain, but knots and irregularities in the wood will also be accentuated. Be cautious and test when applying to soft or porous woods, such as pine, fir, spruce, maple, alder and aspen. These woods have a tendency to absorb stain unevenly. Treating the wood surface with GF Pre-Stain Wood Conditioner helps prevent blotching to help ensure a beautiful, even stain. Just use the fingernail test. If your fingernail dents the surface, you have a soft wood, like pine or aspen. Liquid oil based stains apply rapidly and easily, do not require as much removal of excess product as gel stains do, and come "alive" beautifully when top coated. If speed of application is important to you, choose a liquid oil based stain.
Gel Stains and Top Coats Unlike liquid stains, gel stain are thick. Gel Stains build color faster and have a very high "touch" factor during the finishing process. And they do not splash, drip or run. However, this high urethane content also increases the viscosity (thickness), requiring more wiping away of excess product during the staining process. If you prefer "rubbing" and polishing a finish on, gel stain for you. Gel Stain does require a topcoat to seal in the pigment. For maximum durability, apply either Arm-R-Seal liquid oil based topcoat or Gel Topcoat.
Top Coat Color
Oil based top coats have a slight amber color. High Performance water based top coat dries to a clear finish. Enduro-Var is also water based but it ambers.
Clean Up
Use mineral spirits or paint thinner for clean up.
Dry Time
Oil based products dry more slowly than water based products. In good conditions, allow 6-8 hours. In cold or damp conditions, allow 24 hours.

The sun affects everything! If left in strong sunlight, the materials in stains will fade like everything else does in the sun.
Disposal
When using oil based finishes, take careful precautions when disposing of waste products. Rags, steel wool or other waste soaked with these products may spontaneously catch fire if improperly discarded. Immediately after use, place rags, steel wool or waste in sealed, water filled, metal container. Dispose of in accordance with local fire regulations.
Mixing Custom Colors
You can create a unique color by mixing any two shades of GF oil based wood stains, or by layering one color over another. Be sure to write down exactly how much of each color is in the mix and mix enough to complete the entire project. Do not mix oil based products with water based products.
Supplies Needed
- A good supply of high quality paper towels or lint free absorbent wiping cloths. Cotton cloth materials such as tee shirts do not absorb well.
- Foam or synthetic brushes, latex paint pad applicators, and an old bristle brush to get paint out of corners. You must brush or wash paint pad applicators before use to remove loose bristles.
- #120, #180 or #220 grit sandpaper for sanding raw wood.
- #320 or #400 grit sandpaper or superfine sanding sponges for buffing in between coats of Top Coat.
Surface Preparation
- Remove all hardware, doors and drawers.
- All surfaces should be clean and free from all dirt and oils.
- Fill all nail holes with putty before sanding. There are two methods: 1. Fill holes before you stain using putty that dries hard and can be sanded and stained, or 2. Stain the wood, apply one GF Top Coat, and then use colored putty that matches the stain.
- Good prep sanding is absolutely essential to achieving a good finish! Prepare the surface by using medium paper first, and then proceed to finer grades. For softwoods such as pine, aspen, or alder, sand first with a #120 grit sandpaper, and finish sanding using #150 or #180 grit sandpaper. For closed grained hardwoods such as Oak, Maple or Birch, start with #100 sandpaper and finish with no finer than #120 sandpaper. Never start sanding with very fine sandpaper on unfinished wood.
- Remove all the dust by vacuuming or wiping with a lint-free cloth or tack cloths. End-grains (areas where the wood has been cut against the grain), such as the front side of a table, tend to soak up more stain than other surfaces. Give end-grain areas an additional sanding to control the absorption of stain.
Wipe-on Gel Oil Based Application Guide
Application of Gel Stain
Caution: If finishing an unassembled piece of furniture prior to assembly, care must be taken to avoid getting stain on the areas of the joints. Glue will not stick to surfaces that have finish on them.
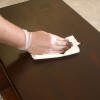
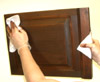
Using a cloth, foam brush or paint pad applicator, apply a liberal amount of Gel Stain to the area of raw wood you are working. Divide your project into sections: drawer front, table or cabinet top, side of chest, etc. Keep the area wet with product while applying. Wipe away the excess with clean cloths or paper toweling (use high quality paper towels that are absorbent - avoid the thin and crispy brands). Change to clean cloths or towels as they become full of product. Rub out the stain until the color is even, applying light pressure with your hand until the first layer of stain evens out in color. As the first coat of stain dries, the appearance will be dull or dry. Take heart, the beauty of the wood will come alive as you add subsequent layers of color and top coats.
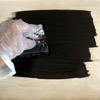
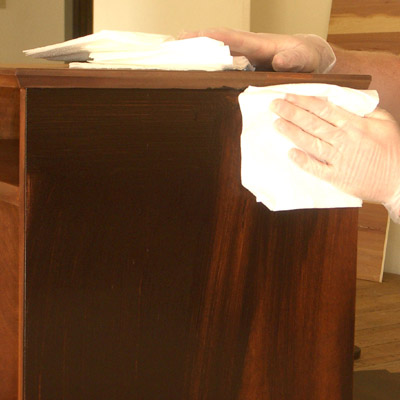
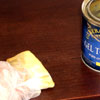
Additional coats of stain may be applied for a deeper, richer color. This photo shows a second coat of Java being applied over the first coat of Java. Sanding between coats of any stain or top coat is referred to as Buffing. We do not recommend buffing between coats of stain because you may remove an area of stain that cannot be re-blended. If you must buff because you have imperfections that need to be smoothed out, do so with caution using a superfine sanding pad or #320 sandpaper. Do NOT buff the last coat of stain.
On the second or third coats of stain, wipe off the excess stain using a clean cloth or paper toweling the direction of the grain. Again, change to clean towels as necessary, and apply light pressure with your hand until the color is evened out, finishing with a polishing motion always in the direction of the grain.
Tip: Keep extra wiping cloths nearby as you work, replacing them as needed until you remove all excess gel stain. Be sure to remove all rag marks and smudges, turning and changing cloths as needed. Several thin coats will give a better result.
¡
Continue to turn the cloth to a clean side as you work. On your last few passes across the surface, use a lighter polishing motion, continuing to work in the direction of the grain. When you achieve the depth of color desired, it is time to move on to optional top coats.
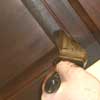
Tip: Use an old dry bristle brush to remove stain buildup from the corners of molding, bead board, etc.
Tip: Protect any wet surfaces that you may handle by using a dry cloth.
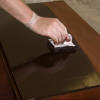
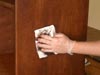
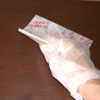
The stain contains a high quantity of pigment, and requires a topcoat. For maximum durability, apply either Arm-R-Seal topcoat or Gel Topcoat over Gel Stain. Apply Gel top coat with a cloth, paint pad or foam brush. Shown here: application using paper toweling.

When applying topcoats, your application process turns into a very light, brisk polishing motion with long light sweeping strokes, as the Top Coats glide along the smoother surface of the previous stain coats. Several thin coats give the best result.
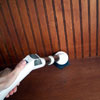
Buff lightly between each top coat with a super fine sanding pad or #320 sand paper. Do not buff the final topcoat. Sanding pads are far superior to sand paper as they form around moldings and corners and they last a long time. We like using a well-worn pad on the last few coats of top coat to promote a fine finish.
Tip: If your super fine sanding pad is new, use it on raw wood first when working with the final finish coat.
Vacuum or wipe down after buffing each layer of top coat.
Last step - just start admiring your beautiful furniture.
Drying Information
Good conditions, 6-8 hours. Cold or damp conditions, 24 hours.
Coverage
200 square feet per quart.
Wipe-on Liquid Oil Based Application Guide
1. Staining
- Wipe-on Liquid Oil Based Stains contain colored pigments that often settle to the bottom of the can and must be thoroughly mixed before application. It may take as much as five minutes to thoroughly mix the contents of the can so that the color remains consistent as the contents are used up.
- Do a test first on the back, bottom or other inconspicuous area of the furniture to check the stain color before proceeding. If the stain looks evenly coated and you like the look, one coat staining is adequate. If the stain is too light or uneven, a second coat of stain may be needed before the topcoat is applied.
- Apply using a foam brush, bristle brush, paint pad applicator, or a lint-free cloth such as an old T-shirt.
- Stain one surface at a time. As you stain each area, remove excess stain by wiping with a clean cloth. It is important to wipe off the stain thoroughly and consistently (in the direction of the grain) to get an evenly stained surface.
- If a darker, or deeper color is desired, allow the first coat of stain to dry for 24 hours, then apply a second coat of stain in the same manner as the first. Never buff a stain coat, only top coats.
Note: The white colorant in White Mist is titanium dioxide, which penetrates far less than the earth clay pigments found in all other stain colors. White stain is often called pickling stain as it lets much of the wood color show through. It is not paint and will not cover like paint. Apply White Mist as directed above. Be sure to wipe off the excess well to prevent lifting during the application of the top coat. A second coat will add a little more color. Let White Mist dry for 24 hours before a second coat or top coats.
2. Optional Pre-Stain Conditioner
GF Pre-Stain Wood Conditioner is specifically designed for use before staining new or bare soft and porous wood surfaces such as with Aspen or Pine. It penetrates the grain of the wood to promote uniform acceptance of stain, and helps prevent streaking and blotching to help ensure a beautiful, even stain. Prior to staining, apply a liberal coat of the Pre-Stain Wood Conditioner. Allow it to penetrate for 5-15 minutes, then wipe away the excess with a cloth. For highly absorbent woods, you can then apply a second coat, wait, and wipe away the excess again. Allow the pre-stain to dry for 30 minutes before applying stain, but no longer than 2 hours.
IMPORTANT NOTE: Pre-sealing the wood will lighten the color of your stain so test the Pre-stain and the color before starting. A second coat of stain may be applied after the first coat has dried to achieve a darker color.
3. Applying Top Coats
Apply the top coat with a lint-free cloth, foam brush, or paint pad applicator, moving with the direction of the grain. For large surfaces, apply a liberal coat as quickly as possible, evening out the surface with long, smooth strokes, keeping your applicator wet to provide lubrication. A dry applicator can drag on the surface and may cause streaks. (These streaks may be easily removed after the surface has dried by buffing well and recoating). Buff between top coats with '0000' steel wool or #320 or finer grade sandpaper to produce a smooth surface. A minimum of 3 top coats is recommended.
4. Drying Information
Wipe-on Liquid Stains and Top Coats can dry in 6-8 hours under ideal conditions (70% - 75% humidity). Cooler temperatures or higher humidity may extend the time needed for drying up to 12-24 hours or longer. Basements, even with a furnace, fireplace, and dehumidifier, are the worst environments for drying. Provide good ventilation and air movement with a fan to greatly improve dry time. If a stain coat is dry, you should be able to wipe your hand across the surface without feeling any tackiness. If your top coat is dry, sanding will produce a white powder.
5. Coverage
200 square feet per quart.